Step 1: Gather Your Inspection Tools
- Pinless moisture meter (acceptable readings: 6 to 12 percent for wood, under 1 percent for drywall WME).
- Bright flashlight, 500 lumens minimum.
- Smartphone with thermal camera attachment, or borrowed FLIR unit.
- Painter's tape and a marker to flag suspect zones.
- Notepad to log location, reading, and date.
- Nitrile gloves and an N95, in case you encounter mold colonies over 10 square feet.
- Hygrometer to log indoor relative humidity. Target range is 30 to 50 percent. Sustained readings above 60 percent indicate a moisture source somewhere in the envelope.
- Borescope or inspection camera with a 1 meter flexible neck for cavity checks behind cabinets and inside wall penetrations.
- Extension ladder rated for your weight class plus 25 pounds for tools and personal protective equipment.
Step 2: Exterior Perimeter Walk
- Start at the front elevation. Walk clockwise around the structure.
- Inspect grading within 6 feet of the foundation. Soil should slope away at a minimum of 6 inches over 10 feet.
- Check downspout extensions. They must discharge a minimum of 4 feet from the foundation wall.
- Photograph any efflorescence (white chalky residue) on foundation block. This indicates chronic moisture migration.
- Note hairline cracks wider than 1/16 inch. Mark with tape.
- Inspect window wells for standing water or sediment lines above the drain.
- Probe mulch beds with a screwdriver. Soil that stays saturated 48 hours after rain points to drainage failure or a buried downspout collapse.
- Check hose bib penetrations, dryer vent terminations, and electrical conduit entries for failed caulk or missing escutcheons.
- Inspect gutters at three points per run. Standing water, sediment deeper than 1/4 inch, or rust streaks below seams all warrant cleaning before further diagnostics.
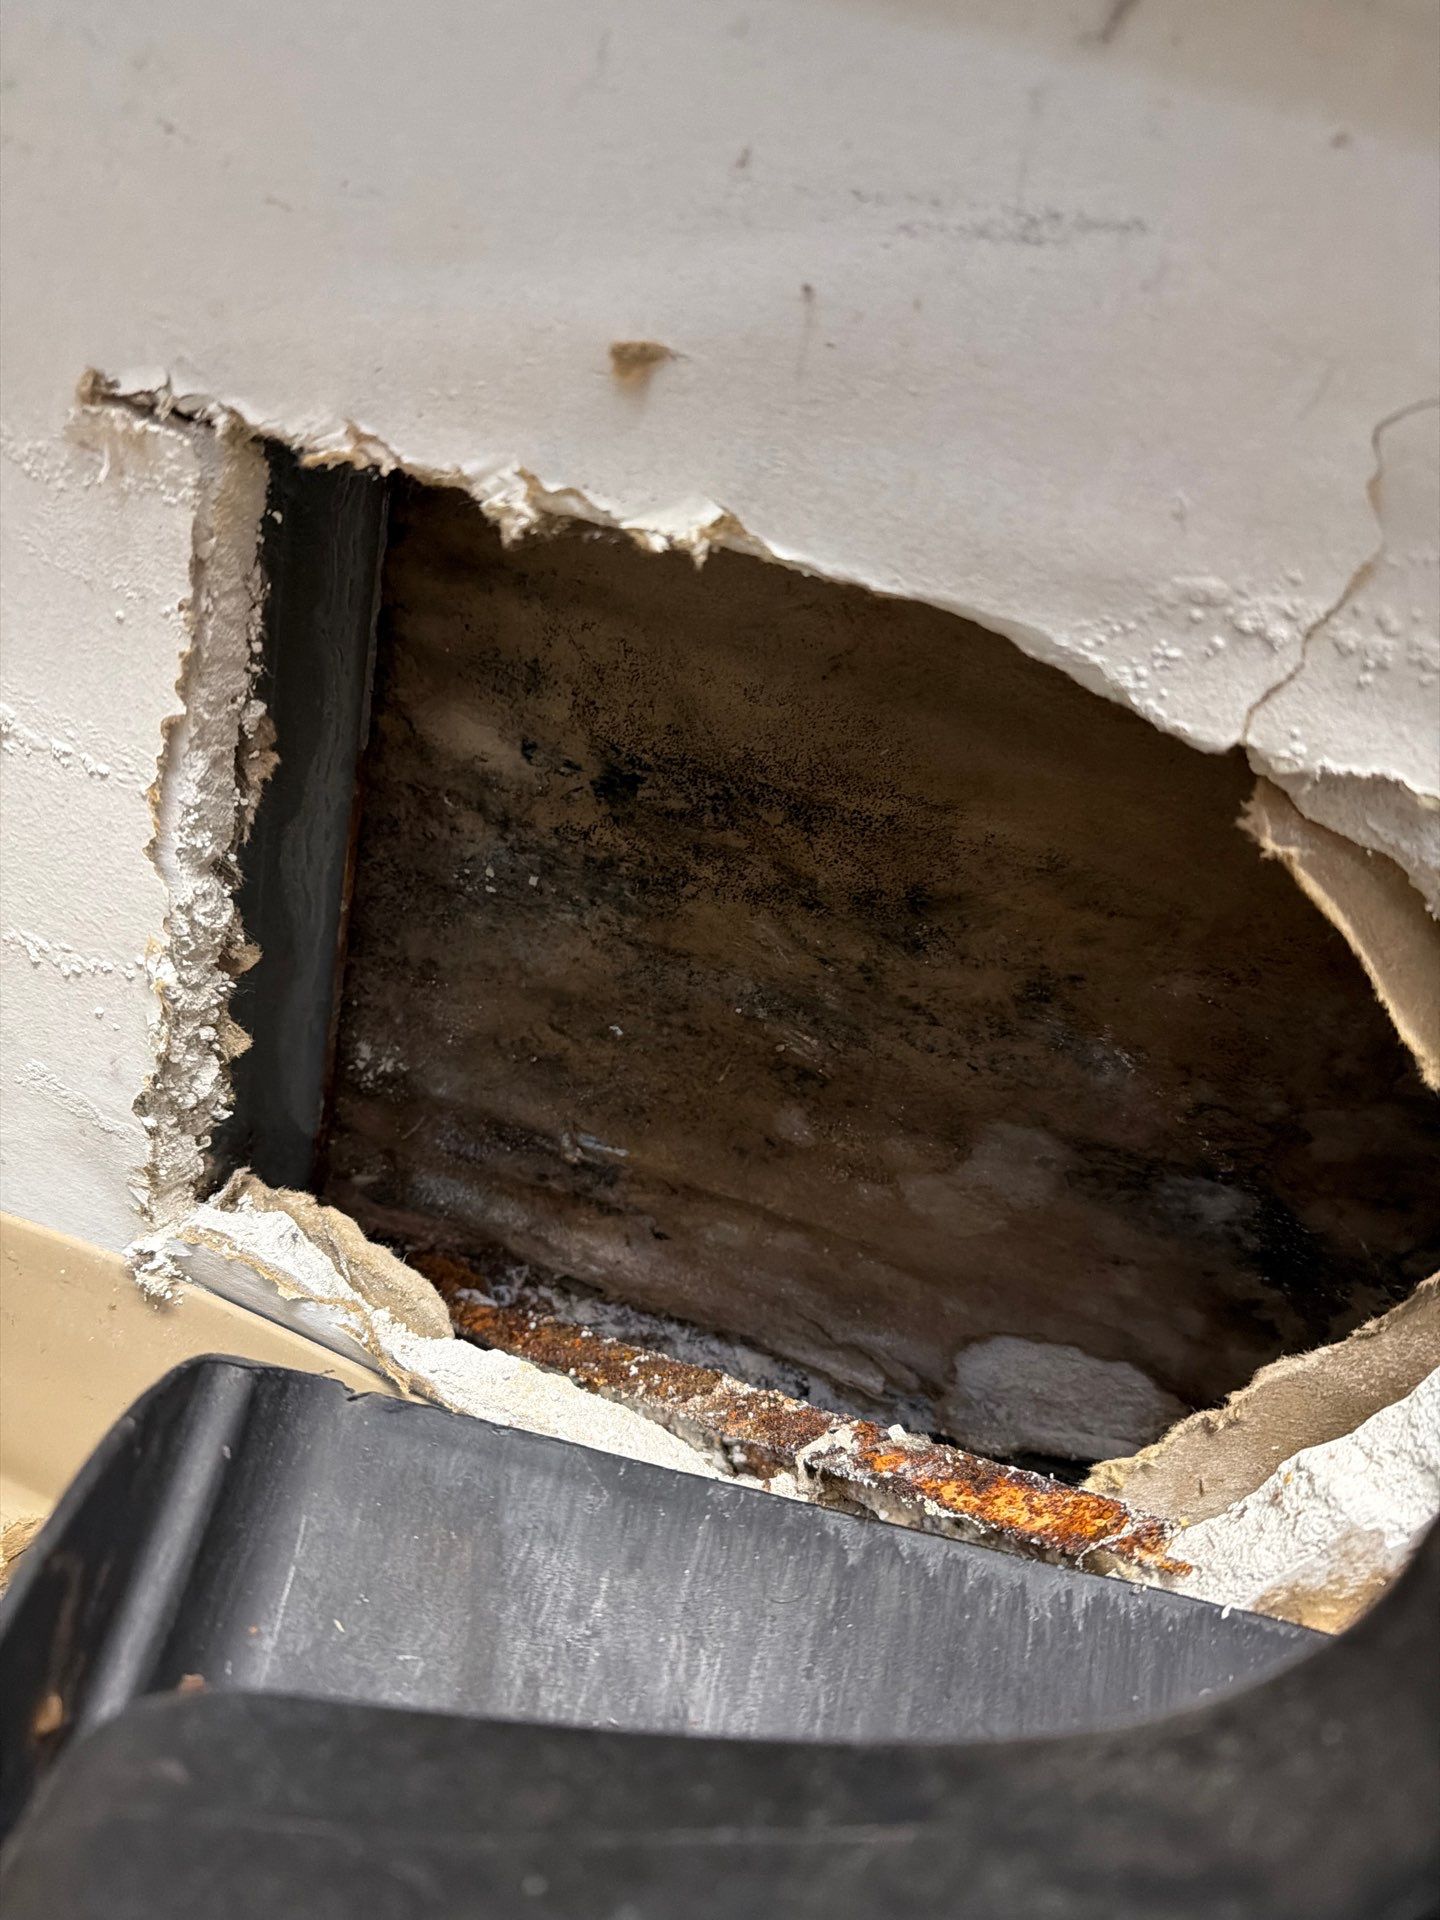
Step 4: Wall Cavity Assessment
- Identify wet wall candidates: any wall sharing a plane with bathrooms, kitchens, laundry rooms, or exterior plumbing.
- Use the pinless meter at 16 inch intervals, scanning from baseboard to ceiling.
- Flag any reading above 17 percent WME with painter's tape.
- Run your hand along the baseboard. Cool, slightly damp, or soft trim indicates wicking from the bottom plate.
- Look for nail pops, bubbling paint, or hairline cracks following stud lines. These are classic indicators of cyclical wetting and drying.
- Smell test: musty, earthy, or sweet odors often precede visible damage by 30 to 60 days.
- Scan with the thermal camera at a 45 degree angle to the wall. Cold spots of 5 degrees Fahrenheit or more below ambient typically map to wet insulation or active leaks.
- Check the top plate where partition walls meet exterior assemblies. Ice dam intrusion often manifests here first, even when ceilings appear clean.
If readings exceed thresholds at multiple points on one wall, escalate to non invasive thermal imaging or refer to our hidden leak detection walkthrough for next steps.
Step 8: Document and Decide
- Compile your flagged readings into a single sheet with location, value, and photo reference.
- If you found three or more readings above threshold, or any visible mold over 10 square feet, contact a professional.
- For confirmed losses, review the insurance claim filing process before contractors begin demolition.
- Shut off the affected water source if a fixture is implicated.
- Photograph everything before any cleanup or repair begins. Insurance adjusters require pre mitigation documentation.
- Contact Van Buren Water Restoration for an on site moisture survey. Crews dispatch within 2 hours for confirmed active leaks in Van Buren.
- Retain all documentation for a minimum of 7 years. Insurers and future buyers may request prior loss history during transactions.
Step 3: Roof and Attic Scan
- From the ground, scan the roof for sagging decking, missing shingles, or compromised flashing at chimneys, valleys, and vents.
- Enter the attic between 10 AM and 2 PM when sun heating exposes thermal differentials.
- Check rafter undersides and decking for dark streaks, frost lines (winter), or active drips.
- Press the moisture meter against decking near plumbing vents and bath fan terminations. Readings above 16 percent indicate active intrusion.
- Inspect insulation for compression, discoloration, or matting. Compressed batts often signal historic leaks.
- Verify bath fan and dryer ducts terminate outside, not into the attic cavity. Improper terminations dump 1 to 3 gallons of moisture per day into the assembly.
- Confirm soffit and ridge ventilation are unblocked. Insulation pushed into the eaves traps humidity against the underside of the decking.
For confirmed ceiling stains or roof origin leaks, our attic water damage and roof leak restoration guide details the exact remediation sequence.
Step 7: Basement and Crawl Space Verification
- Check the sump pit. Water should be 6 to 12 inches below the floor slab. Run a manual test by lifting the float.
- Inspect the perimeter floor to wall joint (cove joint) for staining or active seepage.
- In crawl spaces, the vapor barrier should cover 100 percent of soil. Lift sections to check for condensation pooling.
- Meter floor joists and band boards. Readings above 19 percent indicate active or recent moisture exposure.
- Look for fungal growth: white, black, or grey colonies on framing require professional remediation.
- Verify the sump discharge line is not recirculating water within 10 feet of the foundation. Frozen or crushed discharge lines are a common winter failure point in Van Buren.
Step 5: Floor and Subfloor Inspection
- Walk every room slowly. Note any soft spots, cupping (edges higher than center), or crowning (center higher than edges) in hardwood.
- For tile floors, tap with a coin. Hollow sounds indicate failed thinset, often from subfloor moisture.
- Lift a corner of carpet near suspect walls. Check the pad for staining, hardness, or odor.
- Meter the subfloor through the carpet pad if accessible. Subfloor readings above 16 percent require professional drying.
- In bathrooms, inspect grout lines around toilets and tubs for darkening or missing caulk.
- For laminate, check the seams. Swollen edges or peaking joints indicate moisture entering from beneath.
Step 6: Plumbing and Appliance Touchpoints
- Under every sink: feel supply lines, drain traps, and the cabinet floor. Look for warped particleboard or rust rings.
- Behind the washing machine: inspect supply hoses for bulging or corrosion at the bib connections. Hoses over 5 years old are flagged for replacement.
- Around the dishwasher: pull the kick plate and shine a flashlight under the unit.
- Water heater pan: confirm the pan is dry and drains to a visible termination. Note the unit's age. Tanks over 10 years carry elevated failure risk.
- Refrigerator water line: pull the unit out 12 inches. Check the saddle valve and the flooring directly beneath.
- Toilet base: rock gently. Movement indicates a failed wax ring and likely subfloor rot.
- Ice maker line: confirm the shutoff valve is accessible and not frozen open. Plastic lines older than 7 years should be swapped for braided stainless.